This Tutorial is About Creating Reflections
*********************************
This Tutorial was Created By: Feeblemind
A Small Note
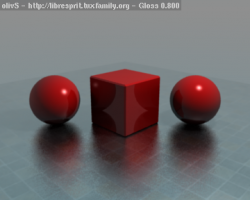
In the past, Blender used EnvMaps (environmental maps) in order to simulate the reflectiveness of objects. But this way was quite difficult, needing the use of Empties (null objects) and layers when a simple reflecting plane was needed. Fortunately, including Raytracing into the renderer eased the whole process and helped to achieve a greater realism.
Preliminaries
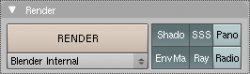
As well as anything related to raytracing with Blender, because of the supplementary calculus time required by your computer, raytracing is only an option that you should feel free to activate and deactivate. This is done by the mean of the Scene menu (F10 key). The Render tab shows a button labeled Ray you will have to activate in order to use raytracing in your pictures. If you do so, you can deactivate the EnvMap button, even if this one shouldn't bother you if you don't.
The Mirror Transp Tab
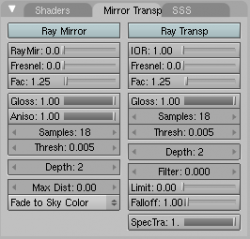
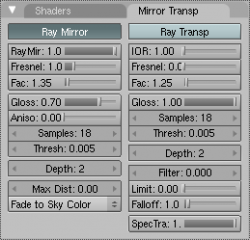
This tab is divided into two parts, the first one being about reflection (Ray Mirror) and the second being about transparency(Ray Transp). We will pay attention to the first one, here. When activating the Ray Mirror button, you can make use of reflection options for the shader of your object. Its surface will reflect its environment at rendering time; the other buttons and sliders are here to help you in controling this reflectiveness
Settings and Defenitions
RayMir: By default, this value is set to 0.00, which is no reflection at all. By increasing this value up to the maximum (1.00), your object will have the same reflectivity as a perfectly polished mirror. Please note that the reflected colors are strictly those of the original environment, whatever is the base color of your object.
Depth: In our reality, reflecting objects located near each other will reflect themselves up to infinity, and it is possible to spot in the reflects of one, the reflects of the others. Unfortunately, this behavior will require an infinite time of calculus to reproduce. Most of the time, you only need a recursivity level of two or three to get visually attractive results; because of this, the default value is set to 2. Beware: if you foolishly increase the value of this parameter, you will suffer from from drastically longer rendering time if you have many reflective objects in your scene.
Fresnel: Let's undertake a small experimentation in order to understand this parameter. After a rainy day, go out and stand over a puddle of water. You can see the ground under the puddle. Now, please kneel just in front of the puddle, your face close to the ground, and look again at the puddle of water. The liquid surface part which is closer to you lets you see the ground, but if you move your glance toward the other end of the puddle, then the ground is gradually masked until all you see id the reflection of the sky. This is the Fresnel effect, and this option sets how much of the surface is effected by it; with a 0.0 value, the surface is 100% reflective, even if the casual observer is glancing from above, and with a 1.0 value, it shows only the natural shader of the object.
Fac: This option sets the intensity of the Fresnel effect.
Colored Reflections
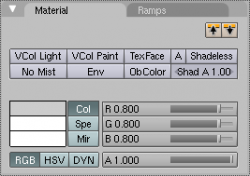
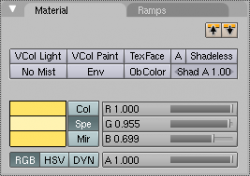
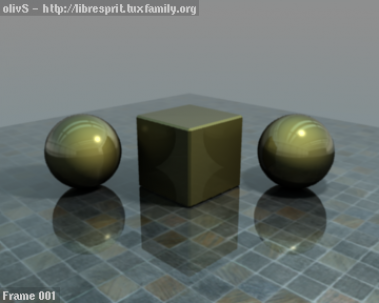
Colored reflections In the Shading menu (F5 key), the Material tab lets you define the color effects of three distincts properties: Col simply colors your object; Spe rather gives a hue to the specular spots on the object; finally, Mir gives a slight color to the reflexion of the object. By default, Mir is pure white, which is quite perfect for chrome effects.
This way, if you'd prefer that your object looks like gold rather than chrome, then you will have to adjust the Col, Spe and Mir properties more accordingly for such a material. Specifically, it is the Mir parameter that gives a different hue to the reflections. Logically, Mir should be the same components as Col, but as Blender is more orientated toward artistic freedom than realism, you can set the colors the way you really want.
This way, if you'd prefer that your object looks like gold rather than chrome, then you will have to adjust the Col, Spe and Mir properties more accordingly for such a material. Specifically, it is the Mir parameter that gives a different hue to the reflections. Logically, Mir should be the same components as Col, but as Blender is more orientated toward artistic freedom than realism, you can set the colors the way you really want.
Blurred Reflections
A careful observation of the objects in our environment shows that glossy objects (reflective, varnished, metallic, etc.) don't reflect the light perfectly, because of some roughness of their surface, for example. The reflections then look more or less blurred. This is the very purpose of the Gloss parameter: with a value of 1.000, the surface is perfectly reflective ; the lower this value, the blurrer the reflections become. Click on the following pictures in order to witness by yourself how the reflections on the ground loose their sharpness when the Gloss value decreased.
The Samples value sets the quality of the blur: high values will provide a very smooth blur but higher rendering times. Thresh is the threshold that puts the sampling to a halt if the previous sample doesn't contribute to the pixel at least at this value (as a percentage), even if the iteration has not reached the set Samples value. Aniso allows for anisotropic blur to occur (when the value equals 1.000) enlighting the direction of the surface's tangent ; with a null value, the blur is perfectly circular. Anisotropy is especially useful for machined objects (lathed objects, for example).
Max Dist sets the maximum distance a ray will travel in order to find a pixel to reflect ; once this distance is reached, the pixel from which the ray has been emitted will herit one of the two following colors (as set by the Ray end fade-out drop menu):
Article written on December the 26th, 2004.
The Samples value sets the quality of the blur: high values will provide a very smooth blur but higher rendering times. Thresh is the threshold that puts the sampling to a halt if the previous sample doesn't contribute to the pixel at least at this value (as a percentage), even if the iteration has not reached the set Samples value. Aniso allows for anisotropic blur to occur (when the value equals 1.000) enlighting the direction of the surface's tangent ; with a null value, the blur is perfectly circular. Anisotropy is especially useful for machined objects (lathed objects, for example).
Max Dist sets the maximum distance a ray will travel in order to find a pixel to reflect ; once this distance is reached, the pixel from which the ray has been emitted will herit one of the two following colors (as set by the Ray end fade-out drop menu):
- Fade to Sky Color: the pixel herits from the color of the sky, as set in the World Buttons
- Fade to Material Color: the pixel herits the base color of the material
Article written on December the 26th, 2004.
